개요
혼자서 개발한 단어 공부앱이 다운로드하는 사람은 많아졌지만, DAU(Daily Active User, 일일 활성화 사용자)가 별로 없는 것을 발견하게 되었습니다. 그래서 DAU(Daily Active User, 일일 활성화 사용자)를 높이기 위한 방법으로 메세지 전송(Push Notification)을 적용하려고 했습니다. 그러나, 가난한 개발자이다보니, 서버를 이용한 메세지 송신(Push Notification)이 아닌 앱(App) 자체에서 메세지를 보내는 방법(Local Push Notification)을 구현하게 되었습니다. 아래에는 여기서 소개해드린 방법이 적용된 저의 앱들입니다. 혹시 관심이 있으신 분들은 다운로드 해 보시기 바랍니다.
- 일본어 단어 공부, 일단 공부: https://deku.posstree.com/app/ildangongbu/
- 韓国語単語勉強、カンタン勉強: https://deku.posstree.com/app/kantanbenkyo/
- TOPIK単語勉強、TOPIK単語1/2: https://deku.posstree.com/app/topik12/
- TOPIK単語勉強、TOPIK単語3/4: https://deku.posstree.com/app/topik34/
- TOPIK単語勉強、TOPIK単語5/6: https://deku.posstree.com/app/topik56/
이 블로그 포스트에서는 react-native-push-notification 라이브러리르 이용하여 앱(App) 자체에서 메세지를 보내는 방법(Local Push Notification)에 대해서 알아보겠습니다.
- react-native-push-notification: https://github.com/zo0r/react-native-push-notification
라이브러리 설치
아래에 명령어로 react-native-push-notification 라이브러리를 설치합니다.
npm install --save react-native-push-notification
0.60 이상 라이브러리 링크
아래에 명령어로 react-native-push-notification을 사용하기 위한 추가 라이브러리를 설치합니다.
npm install --save @react-native-community/push-notification-ios
그리고 아래에 명령어를 통해 설치한 @react-native-community/push-notification-ios 라이브러리를 연결합니다.
react-native link @react-native-community/push-notification-ios
마지막으로, 아래에 명령어를 실행합니다.
cd ios
pod install
cd ..
0.59 이하 라이브러리 링크
아래에 명령어로 react-native-push-notification 라이브러리를 연결(Link)합니다.
react-native link react-native-push-notification
위에서 실행한 명령어의 결과를 보면 알 수 있듯이, 안드로이드(Android)만 연결(Link)되었습니다.
info Linking "react-native-push-notification" Android dependency
info Android module "react-native-push-notification" has been successfully linked
iOS는 아래에 링크를 참고하여 진행해야 합니다.
- iOS manual Installation: https://facebook.github.io/react-native/docs/linking-libraries-ios#manual-linking
먼저 /ios/[project-name].xcworkspace 또는 /ios/[project-name].xcodeproj을 실행시켜 xcode로 실행합니다.

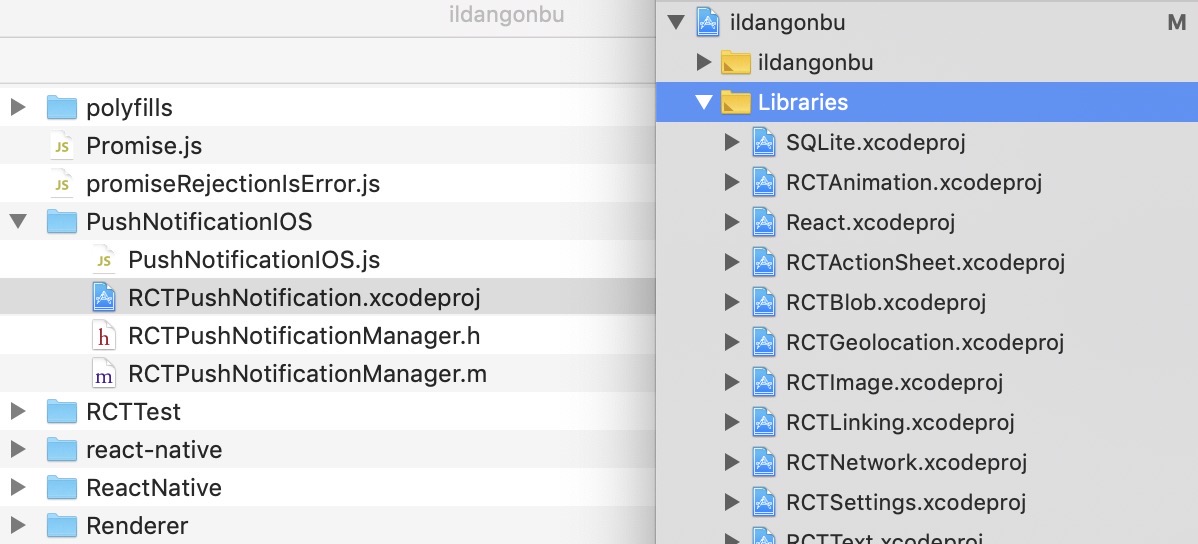
위와 같이 node_modules/react-native/libraries/PushNotificationIOS/RCTPushNotification.xcodeproj를 xcode의 프로젝트명 하단의 libraries에 드래그해서 추가합니다. 주의해야할 사항은 node_modules의 react-native-push-notification가 아닌 react-native입니다.
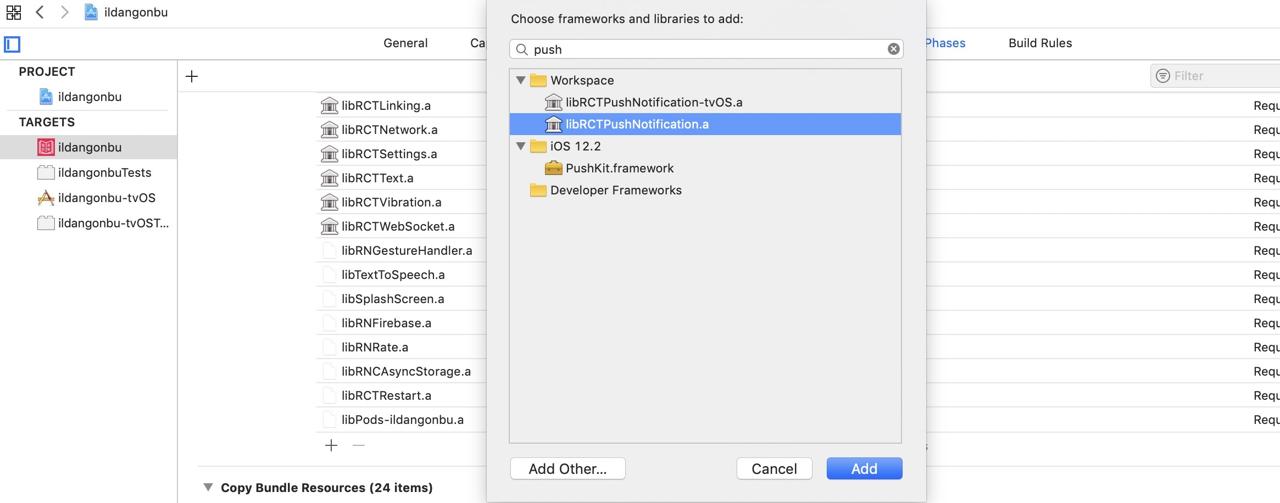
그 다음 아래와 같이 프로젝트명 > Build Phases > Link Binary with Libraries를 선택합니다.

하단에 있는 + 버튼을 누르고 Push를 검색합니다. 검색 결과에 있는 libRCTPushNotification.a를 선택하고 Add를 눌러 추가합니다.

안드로이드 권한 설정
안드로이드에서 local push message를 사용하기 위해서는 ./android/app/src/main/AndroidManifest.xml 파일을 열고 아래와 같이 수정합니다.
<manifest xmlns:android="http://schemas.android.com/apk/res/android"
  package="CHANGE YOUR INFO!!">
    ...
    <uses-permission android:name="android.permission.VIBRATE" />
    <uses-permission android:name="android.permission.RECEIVE_BOOT_COMPLETED"/>

    <application
      android:name=".MainApplication"
      android:label="@string/app_name"
      android:icon="@mipmap/ic_launcher"
      android:allowBackup="false"
      android:theme="@style/AppTheme">

      <meta-data  android:name="com.dieam.reactnativepushnotification.notification_channel_name"
            android:value="CHANGE YOUR INFO!!"/>
      <meta-data  android:name="com.dieam.reactnativepushnotification.notification_channel_description"
                  android:value="CHANGE YOUR INFO!!"/>
      <receiver android:name="com.dieam.reactnativepushnotification.modules.RNPushNotificationPublisher" />
      <receiver android:name="com.dieam.reactnativepushnotification.modules.RNPushNotificationBootEventReceiver">
          <intent-filter>
              <action android:name="android.intent.action.BOOT_COMPLETED" />
          </intent-filter>
      </receiver>
      <service android:name="com.dieam.reactnativepushnotification.modules.RNPushNotificationRegistrationService"/>
      <service
          android:name="com.dieam.reactnativepushnotification.modules.RNPushNotificationListenerService"
          android:exported="false" >
          <intent-filter>
              <action android:name="com.google.firebase.MESSAGING_EVENT" />
          </intent-filter>
      </service>

      <activity
        android:name=".MainActivity"
      ...
</manifest>
위와 같이 추가하였다면 CHANGE YOUR INFO!! 부분에 자신의 정보를 입력합니다. 저는 3개 모두를 Package ID로 변경하여 사용하고 있습니다.
react-native-push-notification 사용하기
아래에 코드는 실제 제가 사용하고 있는 코드입니다.
import { AppState, PushNotificationIOS } from 'react-native';
import PushNotification from 'react-native-push-notification';

const _handleAppStateChange = nextAppState => {
  if (nextAppState === 'active') {
    _registerLocalNotification();
  }
};

const _registerLocalNotification = () => {
  PushNotification.setApplicationIconBadgeNumber(0);
  PushNotification.cancelAllLocalNotifications();

  const messages = [
    '잠깐 시간내서 일본어 공부를 해보는건 어떨까요?',
    '오늘 일본어 공부하셨나요?',
    '일본어 단어를 공부해 보세요.',
    '단어 공부는 매일매일 하는 것이 중요해요.',
    '새로운 단어와 암기한 공부를 복습해 보세요.',
    '일본어를 공부할 시간이에요.',
    '테스트 기능을 사용해서 자신의 실력을 확인해 보세요.',
    '일본어 단어들이 당신을 기다리고 있어요.',
    '일본어, 어렵지 않아요. 공부해 봅시다.',
    '일본어 마스터가 되기위해!',
  ];
  const message = messages[Math.floor(Math.random() * messages.length)];

  let nextHour = new Date();
  nextHour.setDate(nextHour.getDate() + 1);
  nextHour.setHours(nextHour.getHours() - 1);


  PushNotification.localNotificationSchedule({
    /* Android Only Properties */
    vibrate: true,
    vibration: 300,
    priority: 'hight',
    visibility: 'public',
    importance: 'hight',

    /* iOS and Android properties */
    message, // (required)
    playSound: false,
    number: 1,
    actions: '["OK"]',

    // for production
    repeatType: 'day', // (optional) Repeating interval. Check 'Repeating Notifications' section for more info.
    date: nextHour,

    // test to trigger each miniute
    // repeatType: 'minute',
    // date: new Date(Date.now()),

    // test to trigger one time
    // date: new Date(Date.now() + 20 * 1000),
  });
};
export default {
  register: async () => {
    PushNotification.configure({
      onNotification: function(notification) {
        notification.finish(PushNotificationIOS.FetchResult.NoData);
      },
      popInitialNotification: true,
    });

    _registerLocalNotification();

    AppState.addEventListener('change', _handleAppStateChange);
  },
  unregister: () => {
    AppState.removeEventListener('change', _handleAppStateChange);
  },
};
하나하나 상세하게 살펴보도록 하겠습니다.
import PushNotification from 'react-native-push-notification';
...
export default {
  register: () => {
    PushNotification.configure({
      onNotification: function(notification) {
        notification.finish(PushNotificationIOS.FetchResult.NoData);
      },
      popInitialNotification: true,
    });
    _registerLocalNotification();
    ...
  },
  ...
};
우선 이 소스코드를 여러 앱에서 사용하므로 모듈화시켰습니다. register()라는 함수를 실행 시키면 PushNotification을 초기화한 후, 앱(App) 자체 알림(Local Push Notification)을 등록하는 함수를 호출합니다.
const _registerLocalNotification = () => {
  PushNotification.setApplicationIconBadgeNumber(0);
  PushNotification.cancelAllLocalNotifications();

  const messages = [
    ...
  ];
  const message = messages[Math.floor(Math.random() * messages.length)];

  let nextHour = new Date();
  nextHour.setDate(nextHour.getDate() + 1);
  nextHour.setHours(nextHour.getHours() - 1);


  PushNotification.localNotificationSchedule({
    /* Android Only Properties */
    vibrate: true,
    vibration: 300,
    priority: 'hight',
    visibility: 'public',
    importance: 'hight',

    /* iOS and Android properties */
    message, // (required)
    playSound: false,
    number: 1,
    actions: '["OK"]',

    // for production
    repeatType: 'day', // (optional) Repeating interval. Check 'Repeating Notifications' section for more info.
    date: nextHour,

    // test to trigger each miniute
    // repeatType: 'minute',
    // date: new Date(Date.now()),

    // test to trigger one time
    // date: new Date(Date.now() + 20 * 1000),
  });
};
앱(App) 자체 알림(Local Push Notification)을 등록하기 위해 _registerLocalNotification 함수를 실행 시키면,
PushNotification.setApplicationIconBadgeNumber(0);
PushNotification.cancelAllLocalNotifications();
뱃지(Badge)를 초기화 시키고, 기존에 등록되어 있는 알림(Notification)을 전부 제거합니다. 기존에 등록된 알림(Notification)을 전부 제거한 이유는 앱이 실행될 때마다 등록을 시키기 때문에 중복되서 같은 메세지가 발송되는 문제가 있었습니다. AsyncStorage를 통해 제어하려고 하였지만, 그냥 전부 지우고 새로 등록하는 방식을 선택했습니다.
...
const messages = [
...
];
const message = messages[Math.floor(Math.random() * messages.length)];

let nextHour = new Date();
nextHour.setDate(nextHour.getDate() + 1);
nextHour.setHours(nextHour.getHours() - 1);
...
알림 메세지를 랜덤으로 표시하기 위한 변수와, 앱(App)을 실행한 시간을 기준으로 다음날 동일 시간보다 한 시간 빠른 시간에 알림을 보내도록 설정하였습니다.
PushNotification.localNotificationSchedule({
    /* Android Only Properties */
    vibrate: true,
    vibration: 300,
    priority: 'hight',
    visibility: 'public',
    importance: 'hight',

    /* iOS and Android properties */
    message, // (required)
    playSound: false,
    number: 1,
    actions: '["OK"]',

    // for production
    repeatType: 'day', // (optional) Repeating interval. Check 'Repeating Notifications' section for more info.
    date: nextHour,

    // test to trigger each miniute
    // repeatType: 'minute',
    // date: new Date(Date.now()),

    // test to trigger one time
    // date: new Date(Date.now() + 20 * 1000),
});
앱 자체 알림(Local Push Notification)을 등록합니다. 다양한 옵션이 있습니다. 아래에 링크를 통해 확인해 주세요.
저는 배포(Production) 상태에서는
repeatType: 'day', // (optional) Repeating interval. Check 'Repeating Notifications' section for more info.
date: nextHour,
매일, 마지막 접속한 시간보다 한시간 빠른 시간에 메세지(Local Push Notification)를 표시하도록 하였습니다. 테스트할 때는
// test to trigger one time
date: new Date(Date.now() + 20 * 1000),
20초 후 메세지(Local Push Notification)를 표시하게 하거나
// test to trigger each miniute
repeatType: 'minute',
date: new Date(Date.now()),
지금부터 매 분 메세지를 표시하게 해서 테스트하였습니다.
import { AppState, PushNotificationIOS } from 'react-native';
...
const _handleAppStateChange = nextAppState => {
  if (nextAppState === 'active') {
    _registerLocalNotification();
  }
};
...
export default {
  register: async () => {
   ...
    AppState.addEventListener('change', _handleAppStateChange);
  },
  unregister: () => {
    AppState.removeEventListener('change', _handleAppStateChange);
  },
};
AppState를 사용하여 앱(App)이 백그라운드(Background)로 들어갈 때, 활성화(Active)될 때를 체크하여 앱(App) 내부 알림 기능(Local Push Notification)을 다시 등록하였습니다. 이렇게 한 이유는 앱 메세지(Local Push Notification)를 랜덤으로 표시하기 위해서입니다.
앱(App)에 적용하기
위에서 모듈화 시킨 앱(App) 내부 알림 기능(Local Push Notification)을 사용하기 위해 앱(App)이 실행되면 꼭 실행되는 화면 컴포넌트(Component)에서 아래와 같이 사용합니다.
...
import LocalNotification from '~/Util/LocalNotification';
...
export default class LevelScreen extends React.Component<Props, State> {
    ...
    componentWillUnmount() {
        LocalNotification.unregister();
        ...
    }
    componentDidMount() {
        LocalNotification.register();
        ...
    }
}
안드로이드 ic_launcher 아이콘
안드로이드(Android) 알림(Push Notification)을 보면 왼쪽 상단에 작은 아이콘이 표시되는 것을 확인할 수 있습니다. 이 아이콘을 만들기 위해서는 generator-rn-toolbox을 사용하였습니다.
- generator-rn-toolbox: https://github.com/bamlab/generator-rn-toolbox/blob/master/generators/assets/README.md#generate-android-notification-icons
96x96 px 사이즈의 png 파일을 만들고 아래에 사이트에서 이 이미지가 ic_launcher로 잘 표시되는지 확인합니다.
- icons-notification: http://romannurik.github.io/AndroidAssetStudio/icons-notification.html#source.type=image&source.space.trim=0&source.space.pad=-0.1&name=ic_stat_ic_notification
마지막으로, 아래에 명령어로 ic_launcher 아이콘을 생성합니다
yo rn-toolbox:assets --android-notification-icon icon.jpg
generator-rn-toolbox에 대한 설치나 사용법은 이전 블로그 포스트를 참고하시기 바랍니다.
확인
확인을 위해 앱(App) 내부 알림 기능(Local Push Notification)을 등록할 때, 아래에 옵션을 사용하였습니다.
repeatType: 'minute',
date: new Date(Date.now()),
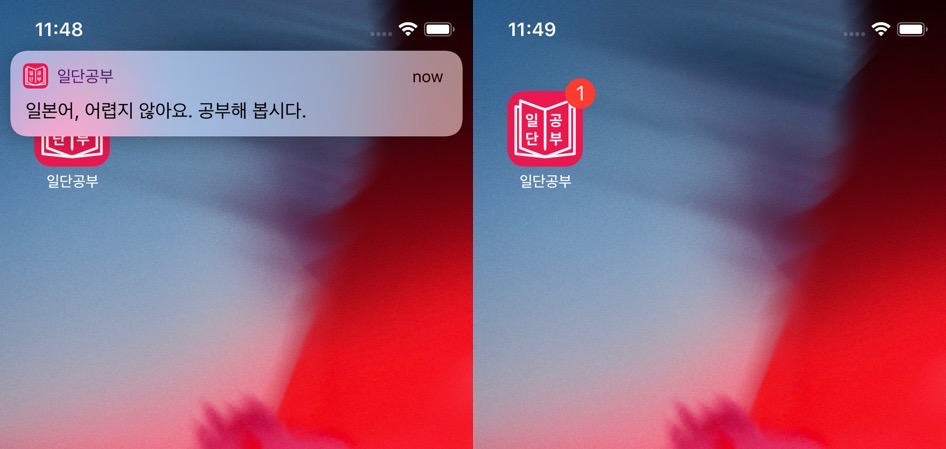
앱(App)을 실행시키고, 앱(App)을 비활성화(종료 또는 백그라운드) 시키면, 1분후 아래와 같이 메세지(Local Push Notification)가 표시되는 것을 확인할 수 있습니다.

앱(App)을 꼭 실행해야 한다는 점과 앱(App)을 비활성화해야 메세지가 표시된다는 점을 주의하시기 바랍니다.
문제점
앱(App)을 실행시키면, 앱(App) 내부 알림(Local Push Notification)이 등록됩니다. 이때 메세지도 함께 등록이 됩니다만, 앱(App)을 다시 실행시켜 앱(App) 내부 알림(Local Push Notification)을 다시 등록하지 않는 이상 항상 같은 메세지가 표시됩니다.
좀 더 다양한 메세지를 표시하고 싶지만, 앱(App)을 다시 실행하지 않는 사용자에게는 항상 같은 메세지가 보이는 불편함이 있습니다.
완료
굉장히 좋은 라이브러인거 같습니다. 앱(App) 내부 이외에도 외부 메세지(Push Notification)도 처리할 수 있는거 같습니다. 나중에 가난에서 벗어나면, 서버를 통한 메세지(Push Notification)도 구현해 봐야겠습니다.
또한, 이 기능이 DAU(Daily Active User, 일일 활성화 사용자)를 높일 것인지, 짜증이나서 앱(App)을 지우게 될지는 좀 더 지켜봐야할 거 같습니다.
제 블로그가 도움이 되셨나요? 하단의 댓글을 달아주시면 저에게 큰 힘이 됩니다!
앱 홍보
Deku가 개발한 앱을 한번 사용해보세요.Deku가 개발한 앱은 Flutter로 개발되었습니다.관심있으신 분들은 앱을 다운로드하여 사용해 주시면 정말 감사하겠습니다.


![[심통]현장에서 바로 써먹는 리액트 with 타입스크립트 : 리액트와 스토리북으로 배우는 컴포넌트 주도 개발, 심통](https://img1c.coupangcdn.com/image/affiliate/banner/7cba8cb0601eebaf88a17a0c3cf65a63@2x.jpg)