개요
RN 프로젝트에 벡터 아이콘을 사용하기 위해 react-native-vector-icons 라이브러리를 사용해 보자.
라이브러리 설치
아래에 명령어로 react-native-vector-icons을 설치합니다.
npm install react-native-vector-icons --save
# For Typescript
npm install --save-dev @types/react-native-vector-icons
설치가 완료되면 아래에 명령어로 라이브러리와 프로젝트를 연결합니다.
라이브러리 연결
react-native-vector-icons을 사용하기 위해서는 설치한 라이브러리를 연결할 필요가 있습니다.
0.59 이하
아래에 명령어를 사용하여 라이브러리를 연결합니다.
react-native link react-native-vector-icons
0.60 이상
0.60 이상부터는 수동으로 연결해야 합니다.
iOS
iOS에 react-native-vector-icons을 연결하기 위해 ios/[project].xcworkspace을 선택하여 Xcode를 실행합니다.

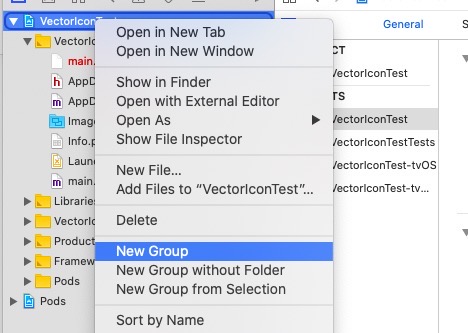
Xcode가 실행되면 위와 같이 프로젝트를 우클릭한 후 New Group 메뉴를 선택하고 Fonts 라는 이름으로 그룹을 생성합니다.

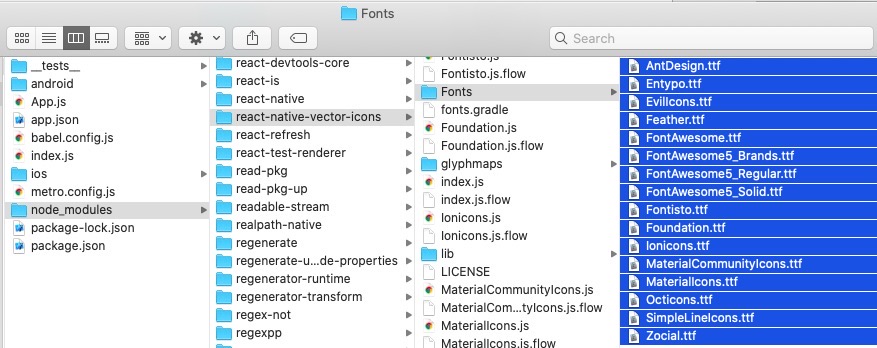
Fonts 그룹을 생성하였다면, 위와 같이 node_modules/react-native-vector-icons/Fonts/로 이동하고 하위에 있는 모든 폰트를 Xcode의 Fonts 그룹으로 드래그합니다.

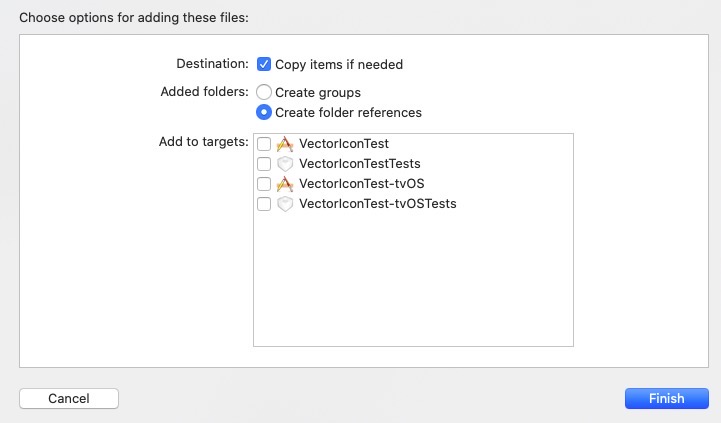
드래그를 하면 위와 같은 화면을 볼 수 있습니다. Copy items if needed가 체크된 상태에서 오른쪽 하단의 Finish 버튼을 선택합니다.
마지막으로 ios/[project]/Info.plist 파일을 열고 아래의 내용을 추가합니다.
<?xml version="1.0" encoding="UTF-8"?>
<!DOCTYPE plist PUBLIC "-//Apple//DTD PLIST 1.0//EN" "http://www.apple.com/DTDs/PropertyList-1.0.dtd">
<plist version="1.0">
<dict>
    ...
  <key>UIViewControllerBasedStatusBarAppearance</key>
  <false/>
  <key>UIAppFonts</key>
  <array>
    <string>AntDesign.ttf</string>
    <string>Entypo.ttf</string>
    <string>EvilIcons.ttf</string>
    <string>Feather.ttf</string>
    <string>FontAwesome.ttf</string>
    <string>FontAwesome5_Brands.ttf</string>
    <string>FontAwesome5_Regular.ttf</string>
    <string>FontAwesome5_Solid.ttf</string>
    <string>Foundation.ttf</string>
    <string>Ionicons.ttf</string>
    <string>MaterialCommunityIcons.ttf</string>
    <string>MaterialIcons.ttf</string>
    <string>Octicons.ttf</string>
    <string>SimpleLineIcons.ttf</string>
    <string>Zocial.ttf</string>
    <string>Fontisto.ttf</string>
  </array>
</dict>
Xcode에서 cmd + shift + k를 눌러 Clean Build Folder를 실행합니다.
Android
안드로이드는 iOS보다 설정이 간단합니다. android/app/build.gradle 파일을 열고 아래에 내용을 추가합니다.
...
apply from: "../../node_modules/react-native/react.gradle"
apply from: "../../node_modules/react-native-vector-icons/fonts.gradle" // add this line
...
그리고 node_modules/react-native-vector-icons/Fonts/ 하위에 파일들을 android/app/src/main/assets/fonts 폴더로 복사합니다.(assets/fonts 폴더가 존재하지 않으면 폴더를 생성합니다.)
마지막으로 안드로이드 프로젝트를 Android Studio를 열고 자동으로 Gradle sync가 되는 것을 기다립니다.
안드로이드 프로젝트를 Android Studio를 열기 위해 아래에 명령어를 사용할 수 있습니다.
# in RN project root folder
open -a /Applications/Android\\ Studio.app ./android
사용법
우리는 기본적으로 사용한적이 있는 경우만 블로그로 작성합니다. 따라서 여기에 작성된 내용은 우리가 사용할 때마다 추가될 것입니다.
사용법에 대한 자세한 사항은 공식 홈페이지를 참조하세요.
- 공식 사이트: react-native-vector-icons
Material icons
Material icon을 사용하는 방법
...
import Icon from 'react-native-vector-icons/FontAwesome';
...

export default class Home extends React.Component<Props, State> {
    render() {
        return (
            <View>
                <Icon name="home" size={24} color="#ffffff" />
            </View>
        );
    }
}
참고
- 공식 사이트: react-native-vector-icons
제 블로그가 도움이 되셨나요? 하단의 댓글을 달아주시면 저에게 큰 힘이 됩니다!
앱 홍보
Deku가 개발한 앱을 한번 사용해보세요.Deku가 개발한 앱은 Flutter로 개발되었습니다.관심있으신 분들은 앱을 다운로드하여 사용해 주시면 정말 감사하겠습니다.


![[심통]현장에서 바로 써먹는 리액트 with 타입스크립트 : 리액트와 스토리북으로 배우는 컴포넌트 주도 개발, 심통](https://img1c.coupangcdn.com/image/affiliate/banner/7cba8cb0601eebaf88a17a0c3cf65a63@2x.jpg)